As an Amazon Associate, I earn from qualifying purchases
If you’ve noticed a decreased water pressure from your Delta kitchen faucet, the flow restrictor may be to blame. Flow restrictors are small devices installed in faucets to limit water flow and conserve water. While they can benefit water conservation, they can also be frustrating if you need a higher flow rate for specific tasks. Fortunately, removing the flow restrictor from your Delta kitchen faucet is a straightforward process that can be done with the right tools and a bit of know-how.

In this guide, we’ll learn how to Remove Flow Restrictor from Delta Kitchen Faucet and help restore your water flow to its full potential.
What is a flow restrictor?
A flow restrictor is a small device installed in plumbing fixtures to regulate water flow. It is designed to limit the amount of water that can pass through the spout at any given time, helping to conserve water and reduce overall water usage.
Flow restrictors are commonly found in faucets, showerheads, and other similar fixtures, typically made of plastic or metal. They work by reducing the size of the water flow channel, causing the water to flow at a slower rate.
Reasons why someone might want to remove it?
Someone might want to remove the flow restrictor from their plumbing fixture for a few reasons. One common sense is to increase the water flow, as flow restrictors can sometimes be too restrictive and limit the amount of water from the fixture.
Removing the flow restrictor can result in a more robust water flow, which can be especially useful for tasks that require a higher water pressure, such as filling a large pot or cleaning dishes. Another reason someone might want to remove the flow restrictor is to address low water pressure issues. Flow restrictors can sometimes contribute to low water pressure; removing them can help improve your home’s overall water pressure.
However, it’s important to remember that removing the flow restrictor can also lead to increased water usage and higher water bills. Additionally, it may affect your fixture’s warranty or violate local plumbing codes, so be sure to check with your manufacturer or local authorities before making any changes.
Overview
Removing a flow restrictor from a plumbing fixture, such as a Delta kitchen faucet, can be simple. Begin by locating the aerator, typically at the faucet’s end. Use pliers to gently twist the aerator counter clock wise until it comes loose from the tap.
Next, find the flow restrictor inside the aerator and carefully pry it out with a flathead screwdriver. Pay attention to its orientation to replace it correctly if needed. Once removed, reattach the aerator and test the water flow.
However, it’s important to remember that removing the flow restrictor can affect your fixture’s warranty or violate local plumbing codes. Hence, it recommends checking with your manufacturer or local authorities before making any changes.
How to Remove Flow Restrictor from Delta Kitchen Faucet?
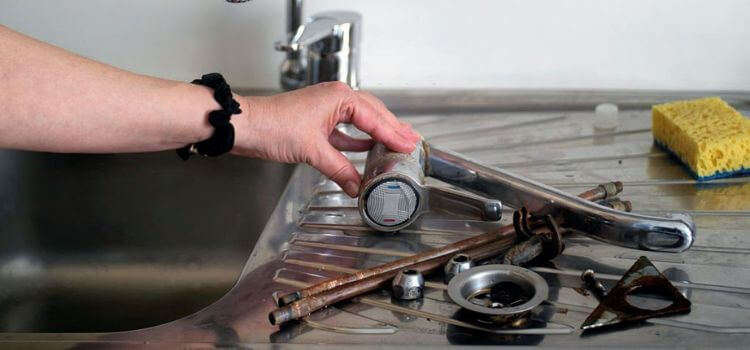
Tools for Removing a Kitchen Faucet Restrictor
List of tools
A blocked or broken faucet restrictor may cause low water pressure from your kitchen faucet. Fortunately, you don’t need a professional plumber to fix the issue. Several tools can help you remove the restrictor and restore water flow to your faucet.
One of the most effective tools is a pair of pliers, which can grip the restrictor and unscrew it from the tap. Another option is to use a screwdriver to remove the retaining screw holding the restrictor. You can also use a wrench to remove the aerator housing and gain access to the restrictor.
Other tools that can come in handy include:
- A cloth or rag to protect the faucet finish.
- A lubricant to loosen any tight fittings.
- A flashlight to help you see into the faucet.
With these tools and some know-how, you can easily remove your kitchen faucet restrictor and restore your faucet’s water pressure.
Explanation of why each tool is necessary
When removing a kitchen faucet restrictor, having the right tools is essential. Each tool serves a specific purpose and makes the task more accessible and more efficient. Pliers, for instance, are a must-have tool for gripping and unscrewing the restrictor from the faucet.
Without them, it can be challenging to remove the restrictor, especially if it’s tightly screwed in place. A screwdriver is also necessary for removing the retaining screw that holds the restrictor in place. Using the right size and type of screwdriver is vital to avoid stripping the screw and making the removal process even more difficult.
Turn off Water Supply
Explanation of why turning off the water supply is necessary
When removing a kitchen faucet restrictor, turning off the water supply before beginning the removal process is essential. This process is because the water supply may still be on, and removing the restrictor without turning it off can result in water spurting out unexpectedly and causing damage or injury.
Turning off the water supply also ensures you can work on the faucet without any water pressure, making it easier to remove the restrictor. If the water supply is still on, removing the restrictor can cause water to spray in all directions, making the task more challenging and messy.
Instructions on how to turn off the water supply
Turning off the water supply is important when repairing or upgrading your plumbing system. For example, if you plan on installing a new kitchen faucet, you must turn off the water supply to avoid any water damage or unexpected leaks.
Here are some general instructions on how to turn off the water supply:
Locate the shut-off valve: The shut-off valve can usually be found near your water meter, in a basement or crawlspace, or an outdoor utility area. If you need help locating the valve, consult your home’s plumbing blueprints or contact a professional plumber.
Turn off the valve clockwise to close once you’ve found the shut-off valve. If the valve has a lever or handle, turn it until it is perpendicular to the pipe.
Test the water supply: After you’ve turned off the valve, turn on a faucet to check that the water flow has stopped entirely. If water still comes from the faucet, you may need to turn off additional shut-off valves or contact a professional plumber.
Complete your plumbing task: Once the water supply is turned off, you can safely complete your plumbing task, whether installing a new kitchen faucet, repairing a leak, or replacing a pipe.
What parts of Faucet Controls the flow rate?
Several parts, including the aerator, cartridge, and valve, control the flow rate of a faucet. The aerator is a tiny screen at the end of the faucet that mixes air with the water to reduce the flow rate and conserve moisture. If you want to increase the flow rate, you can remove the aerator or replace it with one with a higher flow rate.
The cartridge is a part inside the faucet handle that controls the flow rate and temperature. It regulates the amount of water from the faucet by adjusting the opening size. You may need to replace the cartridge if you’re experiencing low water pressure or a slow flow rate.
The valve is another part of the faucet that controls the flow rate. It is located inside the faucet body and regulates the extent of water entering it. If the valve is damaged or worn out, it can cause leaks or low water pressure.
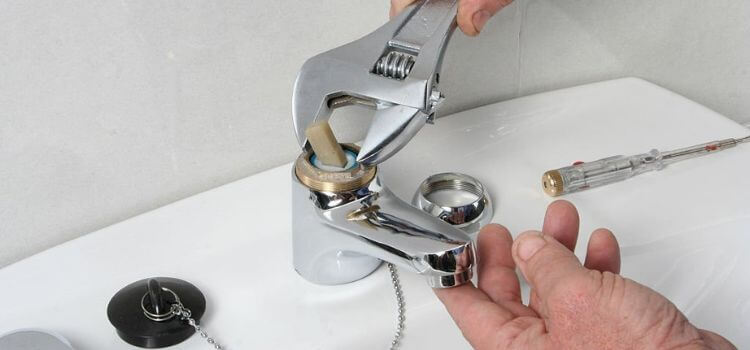
Remove the Faucet Head
Explanation of why the faucet head needs to be removed
Removing the faucet head is necessary in certain situations, such as when you need to clean or replace it or when you need to access the components inside the faucet for repairs. The faucet head, commonly called the aerator, is a tiny component that attaches to the faucet spout’s end. It helps regulate the water flow and prevent splashing.
Over time, mineral deposits and debris can accumulate inside the aerator, causing reduced water flow or a distorted water pattern. To clean or replace the aerator and restore sufficient water flow, you can do so by removing it.
Instructions on how to remove the faucet head
Removing the faucet head or aerator with just a few necessary tools is easy. Start by cutting off the faucet’s water supply to prevent small components from falling down the drain. Cover the drain with a cloth next. After that, to loosen the aerator, grasp its base with a pair of pliers and turn it counterclockwise. If the aerator is challenging to ride, use a cloth or rubber band for better grip.
Once the aerator is loosened, turn it by hand until it comes off. If the aerator is stubborn, you may need to use a wrench, but be careful not to damage the aerator or faucet. Once removed, inspect the aerator for any debris or mineral buildup and clean or replace it as necessary.
Reconnect the aerator by screwing it back onto the faucet spout and turning it clockwise until it is snug. Turn the water supply around and test the faucet to ensure proper water flow.
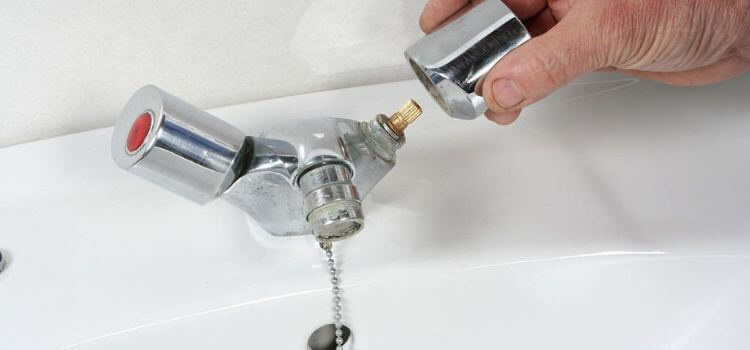
Where is the water flow restrictor located?
Explanation of where the flow restrictor is located
The flow restrictor is a small, round piece inside the faucet spout of many modern faucets. It is designed to regulate the water flow and conserve water usage by limiting it through the faucet.
The flow restrictor is typically made of plastic and has several small holes that allow water to pass through at a reduced rate. To locate the flow restrictor, you must remove the faucet head or aerator, which is the small attachment that screws onto the end of the faucet spout.
Once the aerator is removed, you will see the flow restrictor, which can be identified by its small size and several small holes. Removing the flow restrictor can improve water flow but may affect your faucet’s water usage and void the warranty.
Tips on how to find it
Look for the aerator: The flow restrictor is typically located inside the aerator, a small connection that screws onto the end of the tap spout. Remove the aerator to gain access to the flow restrictor.
Use a flashlight: If you can’t see the flow restrictor inside the aerator, use a flashlight to look for a minor plastic piece with several holes.
Check the manufacturer’s instructions: Consult the manufacturer’s instructions or website for information on the location of the flow restrictor. Some faucets have flow restrictors located in different places, so knowing the specific model of your faucet can help find the location of the flow restrictor.
Contact a professional: If you cannot locate the flow restrictor, consider contacting a professional plumber or the manufacturer for assistance.
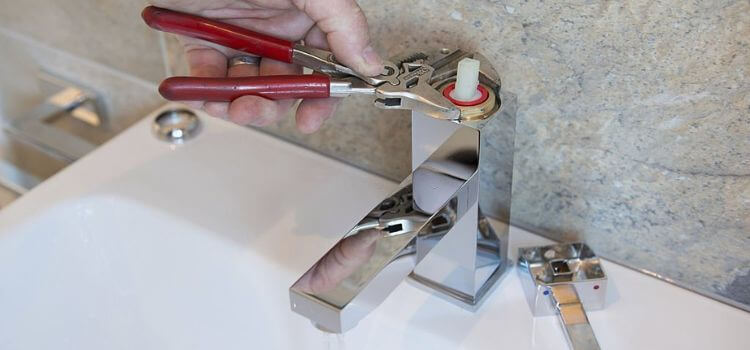
Remove the Flow Restrictor
Explanation of how to remove the flow restrictor
To remove the flow restrictor, start by turning off the water supply to the faucet. Then, find the aerator, the little device that screws onto the faucet spout’s end, and turn it counterclockwise to remove it.
Once the aerator is removed, look inside for the flow restrictor, a small plastic piece with several holes. Use a pair of pliers or a small screwdriver to pry the flow restrictor from the aerator gently. Safely not to damage the aerator or any other faucet parts while doing this. Once the flow restrictor is removed, inspect it for any debris or mineral buildup and clean it thoroughly. You can also replace it with a new flow restrictor if desired.
Finally, tighten the aerator clockwise to the spout, turn on the water supply, and test the faucet for proper water flow.
Tips on what to do if the flow restrictor is difficult to remove
If you’re having trouble removing the flow restrictor from your Delta kitchen faucet, don’t worry. There are a few tricks you can follow to make the process easier.
Firstly, try soaking the aerator in white vinegar or a descaling solution for several hours to dissolve any mineral buildup around the flow restrictor. This restrictor can loosen the flow restrictor and make it easier to remove. Another tip is to use pliers or a wrench to grip the flow restrictor and turn it counterclockwise. Be sure to wrap the pliers’ jaws or wrenches with electrical tape or cloth to prevent scratching or damaging the aerator. If the flow restrictor is still difficult to remove, gently pry it loose with a small screwdriver or dental pick.
Be careful not to damage any other aerator parts while doing this. If all else fails, contact an experienced plumber or the manufacturer for assistance. Removing the flow restrictor may impact your faucet’s water usage and could void the manufacturer’s warranty, so proceed with caution.
Reassemble the Faucet
Instructions on how to put everything back together
Once you have successfully removed and cleaned the flow restrictor from your Delta kitchen faucet, it’s time to put everything back together. Start by ensuring that the aerator and all its components are clean and free from debris or mineral buildup.
Then, insert the flow restrictor back into the aerator, ensuring it’s seated properly. Use a pair of pliers or a small screwdriver to press the flow restrictor into place, if necessary, gently.
Tips on how to make sure everything is working properly
After you’ve removed and cleaned the flow restrictor on your Delta kitchen faucet and put everything back together, it’s essential to ensure everything works properly. Start by turning on the faucet and checking for any leaks or dripping. Double-check that all components properly install and tightened if you notice any leaks.
Next, test the water flow and pressure. If you notice a significant decrease in water flow or pressure, ensure the aerator and flow restrictor is correctly installed and not obstructed by debris. You can also remove the aerator again and run the water to flush out any remaining residue.
Finally, check the hot and cold water handles to ensure they function correctly and the correct water temperature.

Test the Faucet
Explanation of why testing the faucet is important
There are several reasons why testing is essential. It allows you to check for leaks or dripping after reattaching the aerator to the faucet spout. Any leaks could indicate that the components are not correctly installed or tightened and may lead to water damage or wastage.
Instructions on how to test the faucet
To test the faucet:
- Start by turning on the water supply and allowing the water to flow for a few seconds.
- Check the faucet for any leaks or dripping.
- Double-check that all components are correctly installed and tightened if there are any leaks.
Next, test the water flow and pressure by running the water at both hot and cold temperatures. If the water flow or pressure is significantly reduced, this could indicate that some debris remains or that the aerator or flow restrictor is not installed correctly. To address this issue, you can remove the aerator again and run the water to flush out any remaining debris or re-install the flow restrictor properly.
Finally, check the hot and cold water handles to ensure they function correctly and the correct water temperature.
How Do You Clean a Faucet’s Inner Workings Properly?
To begin, turn off the water supply to the faucet. Next, remove the faucet handle by loosening the set screw on the side or bottom of the handle. Once the handle is removed, use an adjustable wrench to loosen the tightened nut and remove it, exposing the faucet stem.

Inspect the faucet stem and remove debris or mineral buildup using a soft-bristled brush or toothbrush. If the mineral buildup is severe, soak the faucet stem in white vinegar for several hours before scrubbing it clean. After cleaning the faucet stem, reassemble the faucet by replacing the packing nut and faucet handle. Turn the water supply on and test the faucet to ensure everything works properly.
Final Thoughts
Removing the flow restrictor from your Delta kitchen faucet can be a simple and effective way to improve the water flow and pressure in your sink. However, it’s essential to approach this task with care to avoid damaging any of the faucet’s components. Keep in mind to turn off the water supply before beginning and to take your time when removing and cleaning the flow restrictor. Feel free to refer to the manufacturer’s instructions or call a qualified plumber if you encounter any problems.
If you found this article helpful in learning how to remove the flow restrictor from your Delta kitchen faucet, why not share it with others who might benefit from this knowledge? By sharing this article with friends and family, you can help others improve their kitchen sink’s water flow and pressure, saving them time and frustration.
FAQs
How To Replace a Faucet Screen?
The screen is at the end of the faucet spout and can become clogged with debris and mineral buildup over time:
- Replace the screen, and turn off the faucet’s water supply.
- Remove the screen from the end of the spout using a pair of pliers or a screwdriver. Clean the screen thoroughly and replace it with a new one.
- Turn on water supply and test the faucet to ensure proper water flow.
Why Is the Water Flow from My Faucet So Slow?
Potential causes include a clogged aerator, a faulty cartridge, or a buildup of mineral deposits in the pipes. The aerator is a small device at the end of the faucet spout that can become clogged with debris and sediment over time, restricting the water flow. The cartridge regulates the water flow and can become worn or damaged, reducing water flow. Mineral buildup can occur over time due to hard water, leading to pipe blockages and reducing water flow.
What is the flow rate of a Delta kitchen faucet?
The flow rate of a Delta kitchen faucet can depend on the specific model and installation. However, Delta kitchen faucets are generally designed to meet or exceed industry water efficiency and conservation standards. Delta faucets typically have a flow rate of 1.5 gallons per minute (GPM) or lower, considered water-efficient and can help reduce water consumption and lower utility bills. Some Delta kitchen faucets also have a flow restrictor, which can further reduce the flow rate while maintaining optimal water pressure.
How do I increase the flow rate of my kitchen faucet?
Check to see if the aerator is blocked with sediment or debris. The aerator is a small device at the end of the faucet spout that can restrict water flow if it becomes clogged. Remove the aerator and clean it thoroughly before reattaching it to the faucet. If this does not get the solution to the issue, check for any kinks or blockages in the supply lines leading to the faucet.
Leave a Reply