As an Amazon Associate, I earn from qualifying purchases
Welcome to the ultimate guide on how to remove gas tank from grill. As an enthusiastic griller, understanding the correct way to handle and maintain your equipment is crucial, including knowing how to remove the gas tank safely. Besides, taking the right steps in this process ensures the longevity of your grill and, most importantly, your safety.
Why Safe Gas Tank Removal is a Must
The importance of safe gas tank removal cannot be overstated. It’s not just about preventing potential accidents but also about maintaining your grill’s optimal performance. As a grill owner, the safe removal of a gas tank from your grill is a skill that you need to master, and here’s why:
Prevention of Accidents: The propane gas in your grill’s tank is explosive, and mishandling it can lead to leaks or even explosions. Knowing how to remove gas tank from grill safely reduces the risk of these dangerous incidents.
Maintenance of Grill Efficiency: Regularly checking and properly removing your gas tank can help you spot any issues affecting your grill’s performance. For example, a leaky tank can cause your grill to heat unevenly or not reach the desired temperature.
Extended Equipment Lifespan: Proper handling and maintenance of the gas tank contribute to the overall care of your grill. When you remove, check, and install the gas tank correctly, you’re taking steps to prolong the lifespan of your entire grilling equipment.
Environmental Responsibility: Proper removal and storage of your gas tank help prevent leaks, contributing to your environmental responsibility efforts. Remember, propane is a greenhouse gas, and preventing unnecessary emissions is good for our planet.
Compliance with Safety Regulations: Safe gas tank removal is often part of local fire safety regulations. Compliance with these guidelines helps ensure your safety and that of your community.
How to Prepare for Remove Gas Tank from Grill?
Before removing the gas tank from the grill, let’s prepare ourselves with the necessary safety measures.
Essential Equipment Checklist
Having the right tools for the job is the first step toward success. Ensure you have protective gloves to shield your hands, safety glasses for eye protection, and your grill’s user manual. The manual often contains specific instructions for your model, so it’s always good to have it nearby.
Critical Safety Warnings
Safety should always be paramount. Always perform this task outdoors in a well-ventilated space, away from potential ignition sources. This includes cigarettes, open flames, or even sparks from electrical tools.
How do you remove a regulator from a gas grill?
Safety Precautions: First, ensure the grill is turned off and cooled down completely. Make sure there aren’t any open fires or other ignition sources around.
Turn Off the Gas Supply: Find the valve on the propane tank and turn it off by rotating it clockwise. This stops the gas from flowing into the grill.
Disconnect the Regulator: The regulator is usually attached to the propane tank via a nut. Loosen this nut by turning it counterclockwise. Some regulators may also be connected to the grill, so be sure to disconnect it from there as well. Never force the nut if it’s too tight; you could risk damaging the regulator or causing a gas leak.
Remove the Regulator: The regulator can be pulled away from the propane tank and grill once disconnected. Handle it gently to prevent any damage.
Inspect the Regulator: After removal, inspecting the regulator for any signs of wear or damage is a good idea. If you see any signs of damage, it’s best to replace it to avoid future problems.
Store the Regulator: If the regulator is in good condition and you plan to reuse it, store it in a safe, dry place to prevent damage.
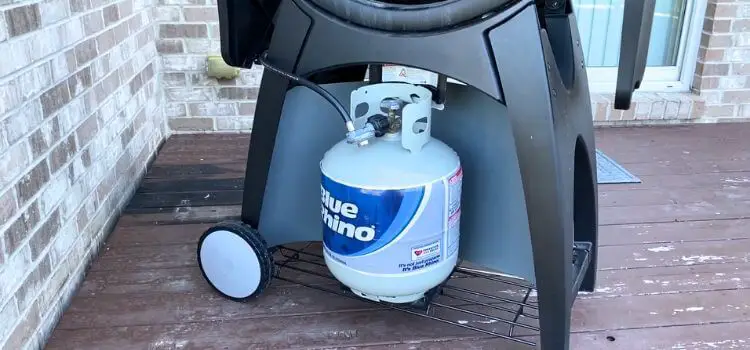
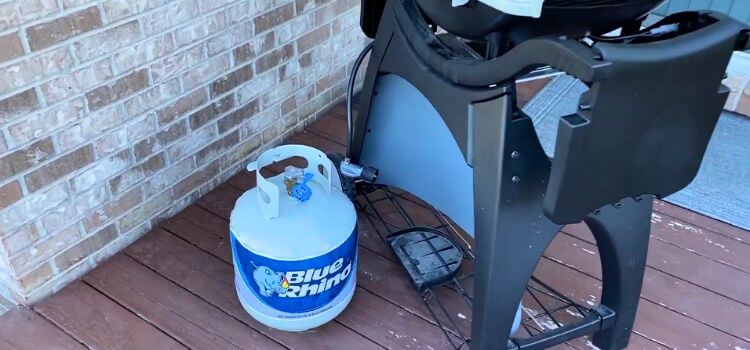
Step-by-Step Guide: How to Remove Gas Tank from Grill
Properly removing a gas tank from a grill requires careful steps. Follow this detailed guide to ensure a safe and successful process:
Step 1: Ensure Your Grill is Off and Cool
Before you start, confirm that your grill is completely off and cool to the touch. Never attempt to remove a gas tank from a hot or even warm grill, as this can lead to potential accidents.
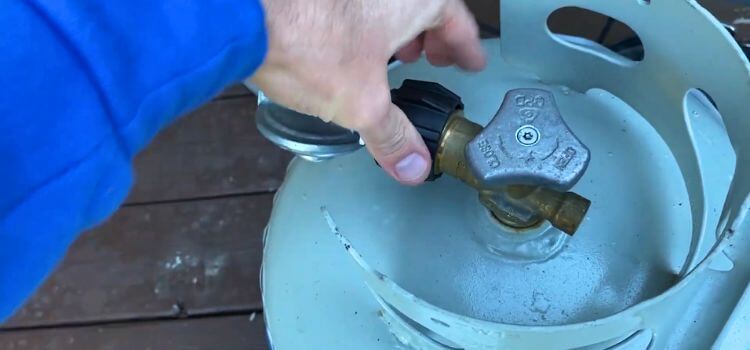
Step 2: Turn Off the Propane Tank
Locate the valve on top of the propane tank. This valve controls the gas flow. Turn it clockwise until it reaches the “off” position. This step ensures that no gas flows out while you’re disconnecting the tank.
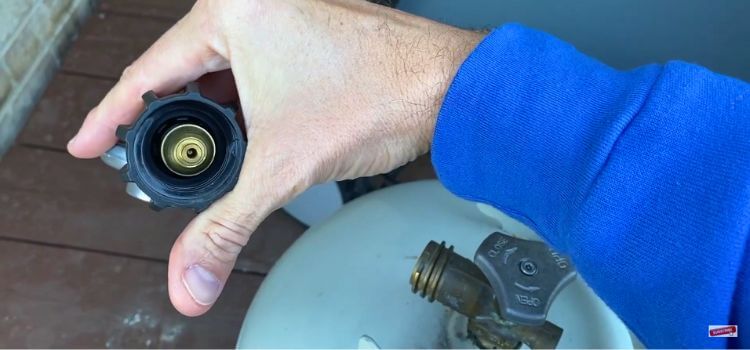
Step 3: Disconnect the Gas Line
Next, you’ll need to disconnect the gas line from the tank. The gas line is usually attached to the tank by a coupling nut. Turn this nut counterclockwise to disconnect it. Always do this with your hand and avoid using tools that could potentially damage the coupling.
Step 4: Carefully Lift Out the Tank
Once the gas line is disconnected, you’re ready to remove the tank from the grill. Propane tanks can be heavy, so be sure to use proper lifting techniques. Bend at your knees and keep your back straight to prevent injuries.
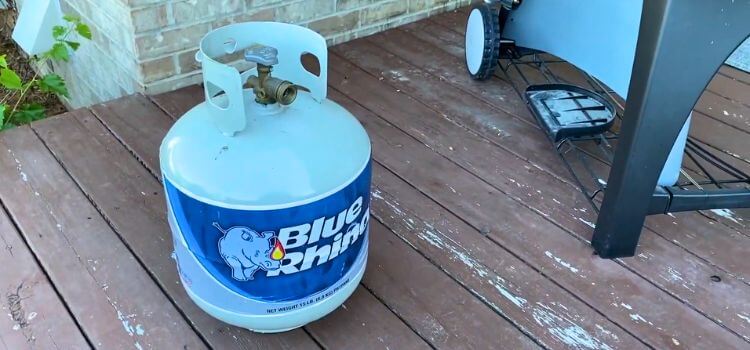
Step 5: Store the Tank Properly
After removing the tank, it’s important to store it correctly. Place it in a well-ventilated outdoor area, away from any potential sources of heat or flame. The tank should always be stored upright to prevent leaks.
Step 6: Check the Tank and Connections
Upon removal, it’s a good idea to check the tank and the gas line connections for signs of wear or damage. This includes checking for possible gas leaks.
Following these steps, you can safely and effectively remove a gas tank from your grill. Remember always to prioritize safety and take your time during each process step.
How to Remove Gas Tank from Grill – Pro Tips
Here we will share authentic tips for How to Remove Gas Tank from Grill:
Routine Checks: Regularly inspect your gas tank and its connections for any signs of wear, rust, or damage. Early detection can prevent potential leaks or malfunctions.
Avoid Forcing Connections: Never force the coupling nut when disconnecting the gas line. If it’s stuck, try using a lubricant to ease the process, but if it remains stuck, seek professional help.
Proper Lifting Technique: Gas tanks can be heavy. Always use a proper lifting technique – keep your back straight, bend your knees, and lift with your legs, not your back.
Mind the Temperature: Propane tanks should not be exposed to extreme hot or cold temperatures. Keep them in a shaded, cool place during hot summer days and warmer places during winter.
Don’t Overfill the Tank: When refilling your propane tank, never fill it more than 80%. Propane needs room to expand, and overfilling can lead to pressure build-up and potential accidents.
Keep Your Grill’s Manual Handy: Your grill’s manual often contains model-specific tips and instructions for handling the gas tank. Always refer to this before starting the process.
Safety First: Last but not least, always prioritize safety. Don’t hesitate to contact a professional if you’re unsure or uncomfortable performing any of these steps.
By keeping these professional tips in mind, you can ensure the safe and easy removal of your grill’s gas tank, enhancing your grilling experience while maintaining safety.
What to Do in Case of a Gas Leak
Leak gas from a tank is a critical situation. First thing you need to remove the tank line from your grill. Make distance to grill and tank.
Here’s what to do more if you suspect a leak:
Turn Off the Gas Supply: By moving the valve atop the propane tank counterclockwise to the “off” position, if it is safe to do so, shut off the gas supply right away.
Don’t Ignite Anything: Avoid creating any sparks or flames. Don’t light a cigarette, strike a match, or turn on light switches or electrical appliances, as these can ignite the gas.
Ventilate the Area: Open all doors and windows to allow fresh air to circulate and disperse the gas. However, only do this if the propane tank is outdoors and it’s safe.
Evacuate the Area: Move everyone away from the area of the suspected gas leak. Keep a safe distance until professional help arrives.
Call for Help: Call your local fire department or a professional gas technician to report the leak. Never attempt to fix the leak yourself.
Don’t Return Until It’s Safe: Only return to the area once a professional has fixed the leak, inspected it, and declared it safe.
Remember, if you smell gas or suspect a leak, always treat it seriously. Your prompt and appropriate actions can help prevent accidents and ensure everyone’s safety.
How do you put a tank on a grill?
Safety Precautions: As always, safety comes first. Ensure no open flames or ignition sources are nearby, and the grill should be off and cool.
Prepare the Tank: Make sure the valve on the propane tank is closed by turning it clockwise. The tank should be in good condition with no visible signs of damage or rust.
Position the Tank: Place the tank in the designated area of your grill. This is typically at the bottom of the grill in a secured area. Ensure the valve where the gas exits face your grill’s connection hose.
Connect the Gas Line:
- Connect the gas line or hose from your grill to the propane tank’s valve. The hose should have a coupling nut that you can screw onto the tank’s valve.
- Turn the coupling nut clockwise to tighten it.
- Don’t overtighten it, but make sure it’s secure.
Check for Leaks: After you’ve connected the tank, it’s important to check for gas leaks. You can apply water and dish soap to the connection points. Open the gas valve slightly. If you see bubbles forming, this indicates a leak, and you should shut off the valve and tighten the connections. If the leak persists, you may have damaged equipment that needs replacing.
Turn On the Gas: You can turn on the gas if there are no leaks. Do this by turning the valve counterclockwise.
Ignite Your Grill: With the gas flowing, you can now ignite your grill according to its instructions.
How do you remove a gas grill hose?
Safety Precautions: Ensure your grill is off and has completely cooled down before starting. Check for any nearby ignition sources or open flames as well.
Turn Off Gas Supply: Locate the valve on the propane tank and turn it off by rotating it clockwise. This will halt the flow of gas to the grill.
Disconnect the Gas Hose: The gas hose is typically attached to the propane tank and the grill’s burners. You’ll need to loosen the coupling nuts at both ends to disconnect it. These can typically be loosened by hand by turning counterclockwise, but you may need to use a wrench if they’re too tight. Remember, do not force it if it’s too tight; seek professional help instead.
Remove the Gas Hose: Once the coupling nuts are loosened, you should be able to easily slide the hose off of the connectors at both ends.
Check for Wear and Tear: After removing the hose, inspect it for signs of wear or damage such as cracks or brittleness. If you notice any damage, the hose should be replaced.
Storage: If the hose is in good condition and you plan to reuse it, store it in a cool, dry place away from direct sunlight.
Conclusion
Congratulations! You’re now equipped with the knowledge about how to remove gas tank from grill. By following these instructions, you’ll ensure a safe grilling environment and prolong the life of your equipment.
Leave a Reply