As an Amazon Associate, I earn from qualifying purchases
Learn how to run natural gas line for outdoor grill to enjoy backyard barbecues like never before. Thanks to this helpful instruction, you’re one step closer to limitless grilling sessions without worrying about propane tanks. Discover the fundamentals of secure connection and installation methods to get your grill fuelled, functional, and prepared for serious searing. Continue reading to learn how to run a natural gas line for your outdoor barbecue and enhance your outdoor cooking game.
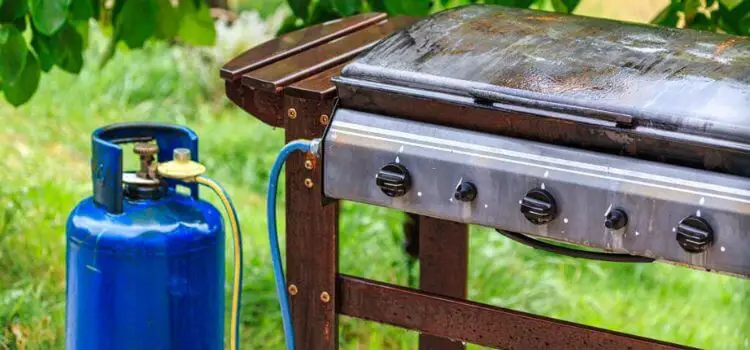
However, installing a natural gas line requires careful planning and should be carried out by a qualified expert to ensure safety and compliance with local standards and laws. Natural gas is a cleaner-burning fuel that is healthier for the environment and produces less emissions.
Can I connect the gas line myself?
You are not advised to connect a gas line to your outdoor barbecue. Gas lines should only be installed and connected by trained professionals since doing so might be hazardous. In many places, it is really against the law to install gas lines without the necessary authorization.
Gas leaks, fire risks, and even explosions might arise from attempting to connect a gas line alone. A qualified expert will know the right steps to take and ensure the installation complies with regional standards and rules. When it comes to gas lines, safety must always come first. A skilled installation will offer you peace of mind and aid in avoiding problems or mishaps.
What is The Best Size Gas Line for a Grill?
The length of the gas line and the BTU (British Thermal Units) rating of the outdoor gas grill will determine the ideal size gas line. Generally, a 1/2-inch gas line has a maximum BTU output of 100,000 and a maximum BTU output of 500,000 for a 3/4-inch gas line. It’s crucial to remember that a gas line that is too narrow may result in inadequate gas pressure, which can affect grill performance and cause longer cook times and uneven heating.
On the other side, for the grill to function well, a gas line that is too big may need to provide more pressure. Consult a qualified specialist who can evaluate your demands and recommend the best size gas line for your outdoor gas grill to make sure you make the proper choice.
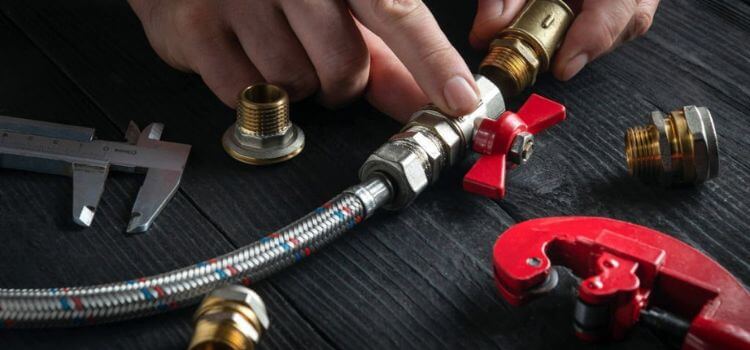
Gather the Necessary Materials and Tools
List the materials and tools required to install a natural gas line for your barbecue.
Specific supplies and equipment are needed to run a natural gas line for your barbecue safely and effectively. The following is a list of some of the necessities you’ll require:
Only trained personnel should install gas lines to ensure local requirements and safety.
Do you need a natural gas regulator for an outdoor grill?
A natural gas regulator is necessary for an outside barbecue, yes. A natural gas regulator is an essential part of any system using natural gas. It aids in regulating the gas’s flow via the line’s pressure. Natural gas is provided at a high pressure that might damage the grill or jeopardize safety without a regulator. Before entering the grill, the regulator will lower the stress to a safe level.
Additionally, regulators may guarantee that, despite variations in the gas supply, the gas flow to the grill stays steady. Selecting a regulator that is suitable for your particular grill and gas line. Consult a qualified specialist to ensure you have the necessary regulator and that it is fitted properly to guarantee your outdoor barbecue’s safe and effective functioning.
How do I connect my gas grill to my natural gas line?
Connecting your gas grill to a natural gas line requires certain precautions for safety and efficiency. A basic explanation of how to connect your gas grill to your natural gas line is provided below:
Purchase a conversion kit – To switch your grill from propane to natural gas, you’ll need a kit made for the model you have.
Turn the gas supply off – Turn off the gas supply to your house to prevent any possible leaks or dangers during installation.
Remove the propane tank – Disconnect and remove the gas tank from your barbecue to remove the propane tank.
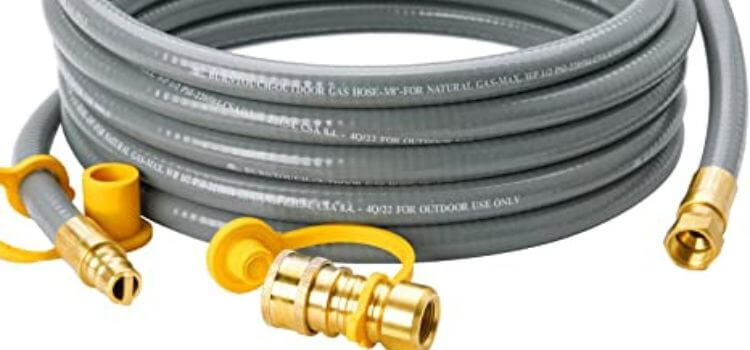
Install the natural gas hose – Install the natural gas hose by attaching it to the gas line’s cutoff valve and the grill.
Install the regulator – To control the gas pressure, install the natural gas regulator between the grill and the shutdown valve.
Test for leaks – Apply a gas leak detector solution to each connection and look for leaks to test for them.
Turn on the gas supply – After ensuring no leaks, test the grill to ensure it operates properly.
To guarantee adherence to local standards and regulations and safety, it is crucial to emphasize that only certified professionals should install gas lines. A qualified expert can also guarantee that the construction is done properly and that the grill runs safely and effectively.
Installation Process
Determine the location of the grill and the gas line.
A site for your grill should take ventilation, accessibility, and safety into account. Choose a location with sufficient ventilation to avoid gas accumulation and reduce the possibility of fire or explosion. Ascertain that the grill has sufficient space between it and any nearby buildings or combustible items.
It’s crucial to check that the gas line is accessible and close to the grill. A qualified expert should install the gas line by regional standards and rules.
The gas line should also be placed to reduce the possibility of harm or disturbance from other outside activities. You may ensure a secure installation procedure and enjoy your outdoor cooking experience with peace of mind by carefully planning the position of the grill and gas line.
Measure the distance between the gas line and the grill.
The distance must be measured to eliminate fire hazards and ensure the gas line can reach the grill.
Finding the gas line and the desired position for the barbecue can help you determine the distance. To account for any bends or curves in the gas line, measure the distance between the two places and add a few additional inches. The position of the gas shutdown valve, which should be simple to reach in an emergency, must also be considered.
Local laws on gas line-grill distance must be followed. Accurate distance measurements provide a safe and successful installation and decrease risk.
Check the local building codes and regulations.
To guarantee legal compliance and a secure installation, it is crucial to check the local building laws and regulations. Local building rules and laws differ from location to location, so it’s important to understand and abide by the particular standards in your region.
Before building a gas connection, certain permissions or inspections could be needed in some locations. Others, though, can limit where the gas line can be put. There can also be specifications for the material used for the gas line, size, or where the gas shutdown valve should be located. Local laws and ordinances must be followed to avoid fines, penalties, and other risks.
You can assure legal compliance and that the installation is carried out securely and effectively by reviewing the local building rules and regulations before beginning. To obey the laws and norms in your region, get advice from a qualified specialist.
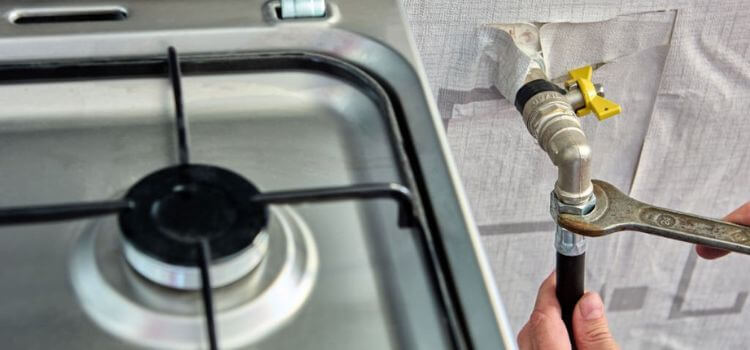
Install the Gas Line
Turn off the gas supply.
Locating the gas cutoff valve and switching off the gas supply to where the gas line will be put before beginning the installation is crucial. This lessens the possibility of a fire or explosion by stopping the gas flow through the tubes while the installation is done.
To avoid accidental ignition, switching off all gas appliances and pilot lights is vital. Test the pipe for any lingering gas after the gas supply has been switched off to ensure that the gas has been entirely cut off. The installation can be done securely only after being certain that the gas supply has been switched off.
When handling gas lines, always take the necessary safety measures, and if you have any questions or concerns, see a competent specialist.
Connect the gas line to the grill & gas supply.
Following the manufacturer’s instructions attentively is crucial when connecting the gas line to the grill and gas supply, a critical stage in the installation procedure.
Attach the gas line to the grill’s regulator using a flexible gas hose, ensuring the connection is tight and secure to avoid gas leaks.
Following the manufacturer’s directions for the particular kind of gas supply connection, connect the other end of the gas line to the gas supply by clicking it. It’s crucial to ensure the connection is solid and secure to avoid gas leakage.
Make sure all gas valves are in the off position and switch on the gas supply before continuing. By pouring a soapy water solution into the gas line connectors and watching for bubbles, you may check the grill for gas leaks. Turn off the gas supply immediately and fix the problem if any leaks are found before continuing.
After installing and turning on the gas, start the grill to test it. Take precautions while dealing with gas lines; if you have questions, see a professional. Follow these steps to install a gas line safely and enjoy outdoor cooking.

How You Can Check The Leaks
Gas leaks may be hazardous and provide a high risk of fire or explosion during the installation of gas lines. You may use a quick and efficient soapy water solution to check for gas leaks.
Turn on the gas supply first, then ignite the grill. Next, combine some water and liquid dish soap in a spray bottle. All gas line connections, including the regulator, hoses, and fittings, should be sprayed with soapy water. Look for any bubbles that develop since they signify a gas leak. If any gas leaks are found, immediately shut off the gas supply and deal with the problem before continuing.
Any gas leaks must be fixed before utilizing the grill to guarantee safety. Always watch for gas leaks, particularly if you can smell or suspect one. You can ensure a secure gas line installation and enjoy your outdoor grilling experience confidently by carefully following these instructions and routinely checking for gas leaks.
Test the Gas Line
Test the Fittings
To avoid gas leaks, ensure all connections are snug and secure before turning on the gas supply and igniting the grill. To test the fittings, apply a soapy water solution to all gas line connections, including the regulator, hoses, and fittings.
Look for any bubbles forming. Bubbles signify a gas leak. Thus, the fitting has to be tightened or changed if they emerge. Before utilizing the gas line, ensuring all fittings are securely fastened is crucial.
Check the pressure of the gas line.
It is advised to use a pressure gauge to verify the gas line’s pressure before turning on the gas supply. To check the pressure, first, disconnect any gas-connected devices and valves. Turn on the gas supply after attaching the pressure gauge to the gas line at the closest valve.
The gas line’s pressure will be shown on the pressure gauge. Verify that the gas line pressure is within the appropriate pressure range for your grill according to the manufacturer’s specifications. If the pressure exceeds the recommended capacity, you may need to modify the regulator or get help from a specialist. For the grill to function effectively and securely, it is crucial to check the gas line’s pressure often.
Turn on the gas supply.
You may switch on the gas supply after checking the gas line fittings for leaks and confirming that the gas line is placed properly. First, ensure that there are no leaks and that all gas line connections are tight. Then, carefully open the gas supply valve and sniff the air for strange or gassy scents.
Turn off the gas supply immediately and remove any strange smells before continuing. After turning on the gas, you may ignite the grill and ensure it is heating up correctly. Before using the grill again, cut off the gas supply and take care of any problems with the gas line or the grill’s heating system. Regularly checking and maintaining the gas line may provide a safe and effective outdoor grilling experience.
How to disconnect the gas grill from the gas line?
Cost to Install Natural Gas Line for Grill
Several variables, including the distance from the gas meter to the grill, the difficulty of the installation procedure, and any required permissions or inspections, might affect the price of installing a natural gas line for a grill. The typical price might be $500 to $2,000 or more. Expenses for trenching and excavating, installing the gas line and regulator, and connecting it to the grill may also be included.
Remember that the installation cost might increase if your home needs extra work, like replacing the gas meter or installing a new gas line. If you want an exact estimate of the cost of installing a natural gas line for your grill, it is advised that you get in contact with a certified professional to assess your particular needs and provide a quotation.
Conclusion
For a flawless and comfortable grilling experience, establishing a natural gas line for your outdoor grilling is more than simply a technical undertaking. Accept the advantages of a constant fuel supply, lower prices, and an environmentally responsible choice. To guarantee a secure and effective installation, please follow our advice. Then, let the good times fly! Install a natural gas line for your outdoor barbecue to transform backyard meals.
FAQs
Make sure your gas grill is built to work with natural gas before connecting the hose to the grill’s gas valve and the gas supply line.
An outside barbecue may indeed have a gas connection attached to it. A professional should carry it out to guarantee safety and adherence to regional rules.
A natural gas pipe may be as long as required to maintain the right gas pressure but normally shouldn’t go over 100 feet.
According to the National Fire Protection Association, a natural gas grill should be placed at least 10 feet away from your house to ensure safety from any possible fire threats.
Some gas grills do not need electricity. However, some versions include electrical components like lighting, rotisseries, and ignition systems.
Leave a Reply